The multimode component library of OptiSystem allows for simulation of links with multimode signals.
The projects presented here are available under OptiSystem installation folder Samples/Multimode.
The first part of this tutorial will describe the library of spatial optical sources and transmitters. These components have the ability to include transverse mode profiles in the optical signals.
There are two categories of components in the library:
- spatial optical sources/transmitters
- transverse mode generators
The spatial transmitters are “ready-to-use” components that encapsulate an optical source or transmitter and a transverse mode generator.
| Component name | Folder | Icon |
| Spatial CW Laser | Transmitters Library/Optical Sources/ | |
| Spatial Laser Rate Equations | Transmitters Library/Optical Sources/ | |
| Spatial LED | Transmitters Library/Optical Sources/ | |
| Spatial Optical Gaussian Pulse Generator |
Transmitters Library/Pulse Generators/Optical/ | |
| Spatial Optical Impulse Generator |
Transmitters Library/Pulse Generators/Optical/ | |
| Spatial Optical Sech Pulse Generator |
Transmitters Library/Pulse Generators/Optical/ | |
| Spatial Optical Transmitter | Transmitters Library/Optical Transmitters/ | |
| Spatial VCSEL | Transmitters Library/Optical Sources/ | |
Table 1: Spatial optical sources, transmitters and pulse generators
The second category is the transverse mode generators. These components allow for adding a transverse mode profile in the optical signal.
| Component name | Folder | Icon |
| Multimode Generator | Transmitters Library/Multimode/ | |
| Laguerre Transverse Mode Generator |
Transmitters Library/Multimode/ | |
| Hermite Transverse Mode Generator |
Transmitters Library/Multimode/ | |
| Donut Transverse Mode Generator |
Transmitters Library/Multimode/ | |
| Measured Transverse Mode Generator |
Transmitters Library/Multimode/ |
Table 2: Transverse mode generators
This means you can directly use one of the components from Table 1 or you can combine any optical source, transmitter of pulse generators with one of the transverse mode generators from Table 2 and build a new subsystem.
The second part of the tutorial presents the passive components that allow for translation and rotation of the optical field, as well as focusing an optical beam or applying an aperture in order to limit the optical beam.
Finally, a description of the receiver and photodetector components is presented.
Multimode Transmitters
Global parameters
The first step when using OptiSystem is setting the global parameters.
As we already know, one of the main parameters is the time window, which is calculated from the bit rate and sequence length.
For multimode simulations, there are additional parameters that will define the space window for the transverse mode profiles. These parameters are the Space width X and Y and the Grid spacing X and Y, and are available in the global parameters window (Figure 1).
Figure 1: Global parameters: Spatial effects tab
For this tutorial we will use the default parameters, except for the bit rate, that should be changed to 10 GB/s
- In the global parameters dialog box, change the parameter Bit rate to 10e9. The Time window parameter should be 1.28e-8 s (Figure 2).
Figure 2: Global parameters: Simulation parameters tab
System setup
After setting the global parameters, we can start adding the components to design the basic multimode transmitter.
From the component library drag and drop the following component in to the layout:
- From “Default/Transmitters Library/Optical Sources”, drag and drop the “CW Laser” into the layout.
- From “Default/Transmitters Library/Multimode”, drag and drop the “Multimode Generator” component into the layout.
- From “Default/Visualizers Library/Optical”, drag and drop the “Spatial Visualizer” into the layout.
The next step is to connect the components according to Figure 3.
Figure 3: Multimode transmitter
Spatial effects tab
The spatial effects tab is available for all the spatial optical sources, transmitters and pulse generators, as well as for the transverse mode generator components.
One of the main parameters of the spatial effects tab is the Power ratio array. This array is a string list with the power ratios for each mode.
For example, entering a list of 4 values will allow the user to also specify the properties of a particular mode type for each of these values.
- Open the parameters of the “Multimode Generator” component.
- In the spatial effects tab, for the Power ratio array parameter, enter the following values: 1 2 3 4.
Notice that the parameter Pol. X m,n index array will automatically increase the number of values for the LP index pairs for the generated modes (Figure 4).
Figure 4: Multimode Generator – changing the number of power ratios
- In the spatial effects tab, for the Pol. X m,n index array parameter, enter the following values: 0 0, 2 2, 0 3, 1 3.
This means the multimode generator will generate 4 spatial modes per polarization.
The power ratio per mode will be 0.1, 0.2, 0.3 and 0.4. The total is equal to 1 (100% of the input power).
Each mode will have its own Laguerre-Gaussian profiles, with LP indexes LG00, LG22, LG03, LG13. Both polarizations will have the same spatial modes (Mode polarization parameter is equal to X=Y).
Running the simulation
We can run this simulation and analyze the results:
- To run the simulation, you can go to the File menu and select Calculate. You can also press Control+F5 or use the calculate button in the toolbar. After you select Calculate, the calculation dialog box should appear.
- In the calculation dialog box, press the Play button. The calculation should perform without errors.
Viewing the results
In order to see the results, double click the Spatial visualizer.
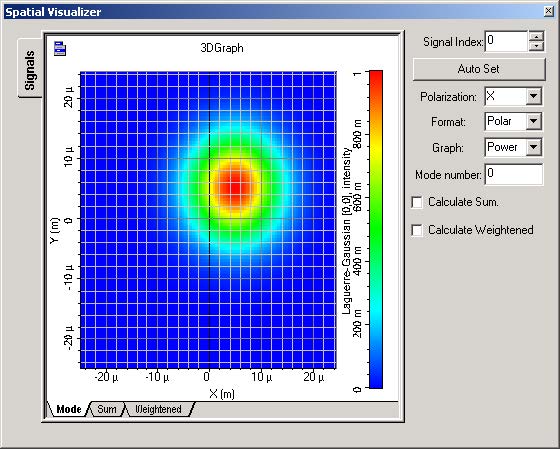
Using the spatial visualizer, you can see the profile of each mode presented at the visualizer input port. The user can select the polarization (X or Y), the format (Polar or Rectangular) and the graph (Power, Phase, Real or Imaginary part).
Additionally, the sum of the modes can be displayed, as well as the weightened sum (Figure 5).
Observe that the spatial dimensions of the graphs are the same as defined by the global parameters Space width X and Y.
Figure 5: Spatial visualizer can display the Individual, Sum and Weightened sum of modes
In order to browse through the modes that are available at the input port, change the mode number parameter and press <Enter>. The visualizer will recalculate the graphs and present the individual mode at the parameter mode index.
Figure 6 presents the real values using rectangular format for each available mode at the input port.
Figure 6: Spatial visualizer displays the real part of the individual modes for each mode index
The combination of the CW Laser and the Multimode Generator component can be replaced by the Spatial CW Laser component:
- From “Default/Transmitters Library/Optical Sources”, drag and drop the “Spatial CW Laser” into the layout.
- In the Spatial CW Laser parameters, use the same parameter values of the spatial effects tab from the Multimode Generator
The next step is to connect the components according to the Figure 7.
You can remove the multimode generator and connect the spatial visualizer to the Spatial CW Laser.
Run the simulation again.
Figure 7: Multimode transmitter using a Spatial CW Laser
This system, built using a component from Table 1, is equivalent to the one in Figure 3, which was built using the components from Table 2.
The results from the spatial visualizer will be the same as presented in Figure 5 and Figure 6.
Multimode components and Free-Space Propagation
When coupling a signal from a laser into a multimode fiber, or from the fiber into a photodetector, we can use the components from Table 3.
| Component name | Folder | Icon |
| Spatial Connector | Passives Library/Optical/Connectors/ | |
| Spatial Aperture | Passives Library/Optical/Multimode/ | |
| Thin Lens | Passives Library/Optical/Multimode/ | |
| Vortex Lens | Passives Library/Optical/Multimode/ |
Spatial connector: translating the optical field
One of the main components is the spatial connector. This components can rotate and translate the optical field, as well as propagate the optical signal in free-space.
- From “Default/Passives Library/Optical/Connectors”, drag and drop the “Spatial Connector” into the layout.
- For the Spatial Connector, change the parameters X and Y shift to 5 μm.
- Add another Spatial Visualize to the layout.
- Connect the components according to Figure 8.
- Run the simulation.
Figure 8: Multimode transmitter and spatial connector
Viewing the results
In order to see the results, double click in the second spatial visualizers and compare the graphs before and after the connector.
The connector applied a spatial shift in both X and Y-axis (Figure 9).
Figure 9: Spatial visualizer displays the transverse mode before and after the connector
In order to see the effects of free-space propagation in the optical field, we can increase the connector parameter Distance:
- For the Spatial Connector, change the parameter Distance to 200 m.
- For the Spatial Visualizers, change the parameters Format to Polar.
- Run the simulation.
Figure 10 compares the transverse mode intensity before and after applying 200 μm of propagation in free-space, you can see that the second beam is larger.
Figure 10: Spatial visualizer displays the transverse mode intensity after a shift of 5 μm in both X and Y directions, before and after 200 μm propagation in free-space
Spatial connector: rotating the optical field
Besides the translation the optical field and the propagation in free-space, the user can rotate the optical field by applying a tilt in the X and Y-axis, or a rotation about the Z-axis.
- For the Spatial Connector, change the parameters X and Y shift to 0 μm, and the Distance to 100 μm.
- For the Spatial Connector, change the parameters X and Y tilt to 5 deg.
- Run the simulation.
Viewing the results
In order to see the results, double click in the both spatial visualizers and compare the graphs before and after the connector.
The connector applied a spatial tilt in both X and Y-axis, visible after the free-space propagation (Figure 10).
Figure 11: Spatial visualizer displays the transverse mode before and after the 5 deg tilt and 100 μm propagation
Thin Lens: focusing the optical beam
By using the thin lens component the user can focus or defocus the optical beam.
- From “Default/Passives Library/Optical/Multimode”, drag and drop the “Thin Lens” component into the layout.
- Add another “Spatial Connector” and “Spatial Visualizer’ to the layout.
- For the “Spatial CW Laser”, set the parameter Pol. X spot size to 15 μm.
- For the first spatial connector, set the shift and tilt parameters to 0, and the parameter Distance to 10 μm
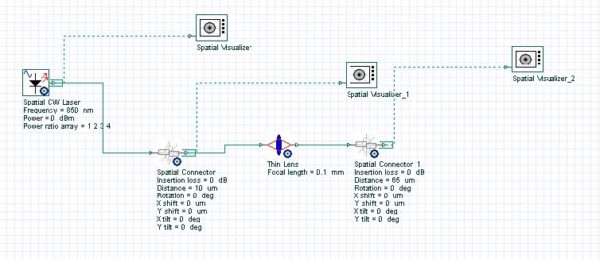
- For the second spatial connector, set the shift and tilt parameters to 0, and the parameter Distance to 65 μm.
- For the thin lens, the parameter Focal length to 0.1 mm.
- Connect the components according to Figure 12.
- Run the simulation.
Figure 12: Using the thin lens component to focus the optical beam
Viewing the results
In order to see the results, double click in the spatial visualizers and compare the graphs before and after the second connector. The large beam after the first connector is reduced by the combination of thin lens and free-space propagation.
Figure 13 presents the optical field at the output of the first connector and at the output of the second connector.
Figure 13: Spatial visualizer displays the transverse mode before and after focusing the beam using the thin lens
Spatial Aperture: limiting the optical field
By using the spatial aperture component the user can reduce the optical field by filtering the optical power that falls outside the aperture area.
- From “Default/Passives Library/Optical/Multimode”, drag and drop the “Spatial Aperture” into the layout.
- Remove the thin lens and the second connector from the layout.
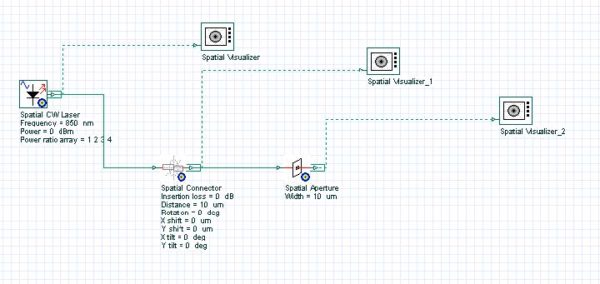
- Connect the components according to Figure 14.
- Run the simulation.
Figure 14: Using the spatial aperture component to limit the optical beam
Viewing the results
In order to see the results, double click in the spatial visualizers and compare the graphs before and after the spatial aperture.
The output beam is limited to the aperture diameter of 10 μm (Figure 15).
You can use the spatial aperture to simulate component misalignments, e.g. fiber/detector power coupling.
Figure 15: Spatial visualizer displays the transverse mode before and after the spatial aperture component
The user can also select a rectangular square type for the spatial aperture:
- For the spatial aperture, set the parameter Aperture type to “Square”.
- Run the simulation.
Observe that the optical beam will have a square shape after the spatial aperture (Figure 16).
Figure 16: Spatial visualizer displays the transverse mode after the square spatial aperture component
Multimode Receivers
Similar to the multimode transmitter, where the use can select a ready-to-use spatial component from the library, or build new spatial components by combining the spatial and no-spatial components, OptiSystem has also different multimode receiver components (Table 4). These components are a combination of the spatial aperture component and the optical receivers or photodetectors.
| Component name | Folder | Icon |
| Spatial Optical Receiver | Receivers Library/Optical Receivers/ | |
| Spatial PIN Photodetector | Receivers Library/Photodetectors/ | |
| Spatial APD Photodetector | Receivers Library/Photodetectors/ |
The main parameter of the spatial receivers or photodetectors is related to the detector active are, defined by the parameter Width.
System setup
Using the same previous global parameters, we can start adding the components to design the basic multimode link. From the component library drag and drop the following component into the layout:
- From “Default/Transmitters Library/Optical Transmitters”, drag and drop the “Spatial Optical Transmitter” into the layout.
- For the Transmitter, change the parameter Pol. X. spot size (Spatial effects tab) to 15 μm.
- From “Default/Receivers Library/Optical Receivers”, drag and drop the “Spatial Optical Receiver” component into the layout.
- For the Receiver, change the parameter Thermal noise (Noise tab) to 5e-22 W/Hz. This will give a receiver sensitivity of ~ -17 dBm (10 GB/s, Q = 6).
- From “Default/Visualizers Library/Electrical”, drag and drop the “BER Analyzer” into the layout.
- From “Default/Visualizers Library/Optical”, drag and drop two of the “Optical Time Domain Visualizer” into the layout.
- Set all the parameters of the spatial connector to 0.
Using the connector and visualizer from the previous layout, the next step is to connect the components according to the Figure 17.
Figure 17: A multimode link using the spatial transmitter and receiver
Run the simulation and after the simulation is finished observer the results from the BER Analyzer.
Viewing the results
The link of Figure 17 is almost ideal, because we do not have any major losses or misalignments between the transmitter and receiver. The spatial connector is ideal and there is only a small loss due to the difference between the input signal spot size and active area of the photodetector (10μm and the mode spot size of 15 μm).
Figure 18 presents the eye diagram for the system of Figure 17, observe the back-to-back value of the Q factor.
Figure 18: BER Analyzer displaying the eye diagram of the ideal link
In order to visualize the effects of misalignment between the transmitter and receiver, we will apply a longitudinal shift in the optical field using the spatial connector component.
Using OptiSystem parameter sweep feature, we will apply a spatial shift from 0 to 20 μm in the optical signal.
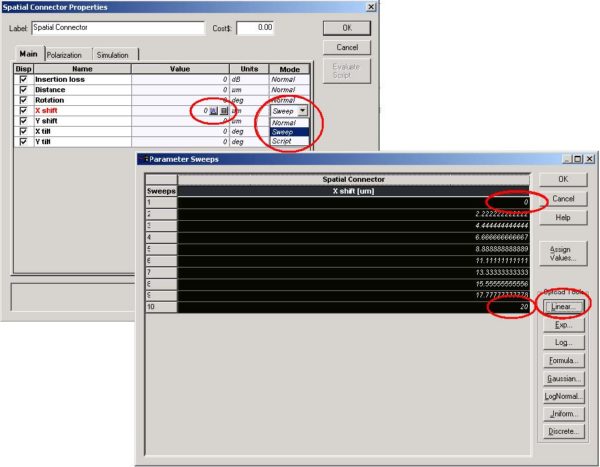
- For the Spatial connector, change the mode of the parameter X shift to Sweep.
- Set the total number of sweep iterations to 10.
- In the parameter sweep dialog box, use a linear spread for the parameter X shift from 0 μm to 20 μm (Figure 19).
Figure 19: Using parameter sweep for the connector parameter X shift from 0 to 20 μm
- Run the simulation
The simulation will run 10 times, one for each value of the X shift parameter. At the end of the calculation, we can browse the results selecting the current sweep iteration, or we can visualize the results of Q-Factor versus X shift using the report page.
- Select the report page.
- Drag and drop a 2D graph into the report.
- From the Project Browser, select the Spatial Connector and drag and drop the parameter X shift into the X-axis of the graph.
- From the Project Browser, select the BER Analyzer and drag and drop the result Max. Q Factor into the Y-axis of the graph (Figure 20).
Figure 20: Combining parameters and results after using report page
As you can see in the Figure 20, the value of Q is decreasing. This is because the optical field is being shifted outside of the photodetector active area, centered at (0,0) with a width of 10 μm. We can achieve similar results by changing the active area width additionally to the shifting of the field.
- For the Spatial connector, change the mode of the parameter X shift to Normal, and set the value to 0.
- For the Spatial receiver, change the mode of the parameter Width to Sweep.
- In the parameter sweep dialog box, use a linear spread for the parameter Width from 10 to 1 μm.
- Run the simulation
- From the Project Browser, select the Spatial Optical Receiver and drag and drop the parameter Width into the X-axis of the report page 2D graph.
The result is presented in Figure 21, where we can see the increase of the Q-Factor with the increase of the active area of the photodetector.
Figure 21: The value of Q-Factor versus photodetector active area width
Multimode Fibers and Links
- There are two multimode fibers available in the component library that take in to account the spatial properties. They are components that take in to account the power coupling and propagation of the multiple fiber modes.
- The first model is a general-purpose multimode fiber, with user-defined refractive index profile, and a numerical mode solver. The second model is a graded-index fiber with parabolic index, which uses an analytical mode solver.
| Component name | Folder | Icon |
| Measured-Index Multimode Fiber | Optical Fibers Library/Multimode/ | |
| Parabolic-Index Multimode Fiber | Measured-Index Multimode Fiber |
Table 6: Multimode fibers
System setup
Following the same steps to generate the layout of Figure 17, we can add the fiber component to design the basic multimode link:
- From “Default/Optical Fibers/Multimode”, drag and drop the “Parabolic-Index Multimode Fiber” into the layout.
Add additional visualizers to the layout and connect the system according to the Figure 22.
Figure 22: A link using the multimode fiber
Calculating Fiber Properties
The main parameter of the Parabolic-Index multimode fiber is the Core radius. For this link we are using a 50 μm fiber.
In order to evaluate the fiber properties, such as effective index, group delay and the number of modes, we can calculate fiber properties before running the simulation:
- For the Fiber, enable the parameter Calculate graphs (Graphs tab).
We can also calculate the spatial profile graphs for individual modes, and the overfilled mode profile:
- For the Fiber, enable the parameter Spatial profile graphs and Spatial overfilled graph (Graphs tab).
- Press OK.
After pressing OK, the modes will be calculated and the mode number, radial and spatial graphs will be internally calculated.
Viewing the fiber properties
In order to see the graphs from the multimode fiber, we should use the Project Browser (Figure 23).
Figure 23: Multimode fiber graphs from the Project Browser
By double-clicking on the graph name, we can see the graphs for the different fiber properties.
For example, Figure 24 presents the Refractive index profile graph.
Figure 25 presents the mode number graphs, e.g. LP(m,n) indexes m and n, Effective index and Group delays.
Figure 24: Refractive index profile for the parabolic index fiber
Figure 25: Mode index graphs for the parabolic index fiber
The remaining spatial and radial graph for the individual mode is presented in Figure 26.
The spatial overfilled graph is presented in Figure 27.
Figure 26: Individual mode intensity radial and spatial profile graphs
Figure 27: Spatial overfilled graph
The fiber graphs will be calculated every time you press OK in the component dialog box and after the link calculation. In order to save calculation time, we will disable the spatial graphs calculation.
- For the Fiber, disable the parameter Spatial profile graphs and Spatial overfilled graph (Graphs tab).
- Press OK.
The next step is to calculate the multimode link:
- Run the simulation
- During the calculation, in the calculation dialog box select the ‘Calc. schedulers’ tab.
Observe the calculation progress of the multimode fiber (Figure 28). This is important to estimate the time that simulation will take when calculating multimode links.
Figure 28: Calculation progress for the multimode fiber
Viewing the results
We can use the visualizer to display the simulation results. The first results that we will look at are the spatial profile of the modes at the fiber output.
In order to browse through the modes available at the fiber output port, change the mode number parameter of the third spatial visualizer and press <Enter>. The visualizer will recalculate the graphs and present the individual mode at the parameter mode index.
Figure 29 presents the real values using rectangular format for some of the modes:
Figure 29: Spatial visualizer at the fiber output displaying mode index 0, 5, 12 and 15
We can also visualize the coupling coefficients and the modal delay at the fiber output for each input signal wavelength and spatial mode by using the multimode fiber calculation report (Figure 30):
- For the Fiber, click on the Report parameter (Numerical tab).
Figure 30: Calculation report from multimode fiber
The graph with the coupling coefficients and group delay is also available from the project browser.
Finally you can visualize the graphs from the BER Analyzer (Figure 31).
Figure 31: BER Analyzer at the receiver output
The same steps can be applied to second multimode fiber model, the Measured-Index Multimode Fiber.
Because the index is measured, the user should provide the refractive index profile with the proper format instead of simply changing the core radius of the parabolic index fiber.


